Combat
When a fleet arrives at a star it does not own, a battle decides who walks away with the star. You do not control a battle directly — it resolves the instant your fleet arrives — but understanding how it works lets you commit the right force and pick the right fights.
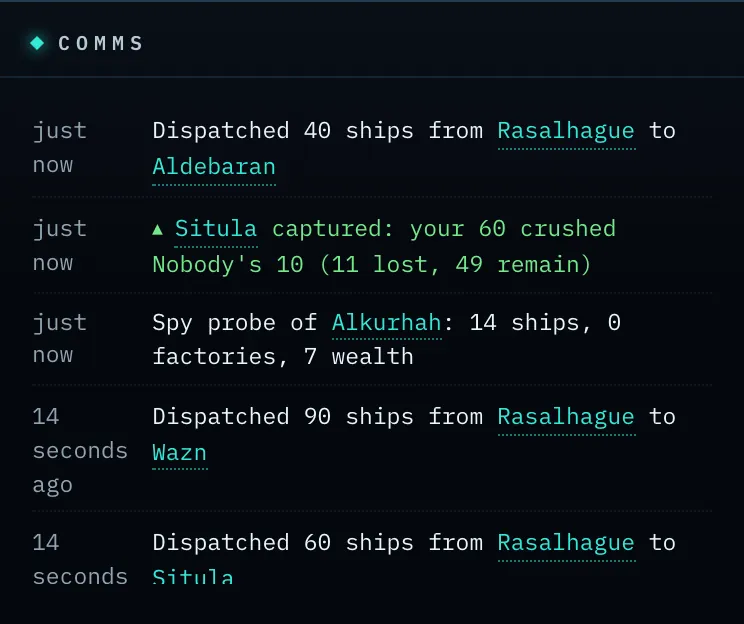
Screenshot: the Comms feed showing a battle result — attacker and defender forces and the outcome (star captured, or assault failed).
How a battle is fought
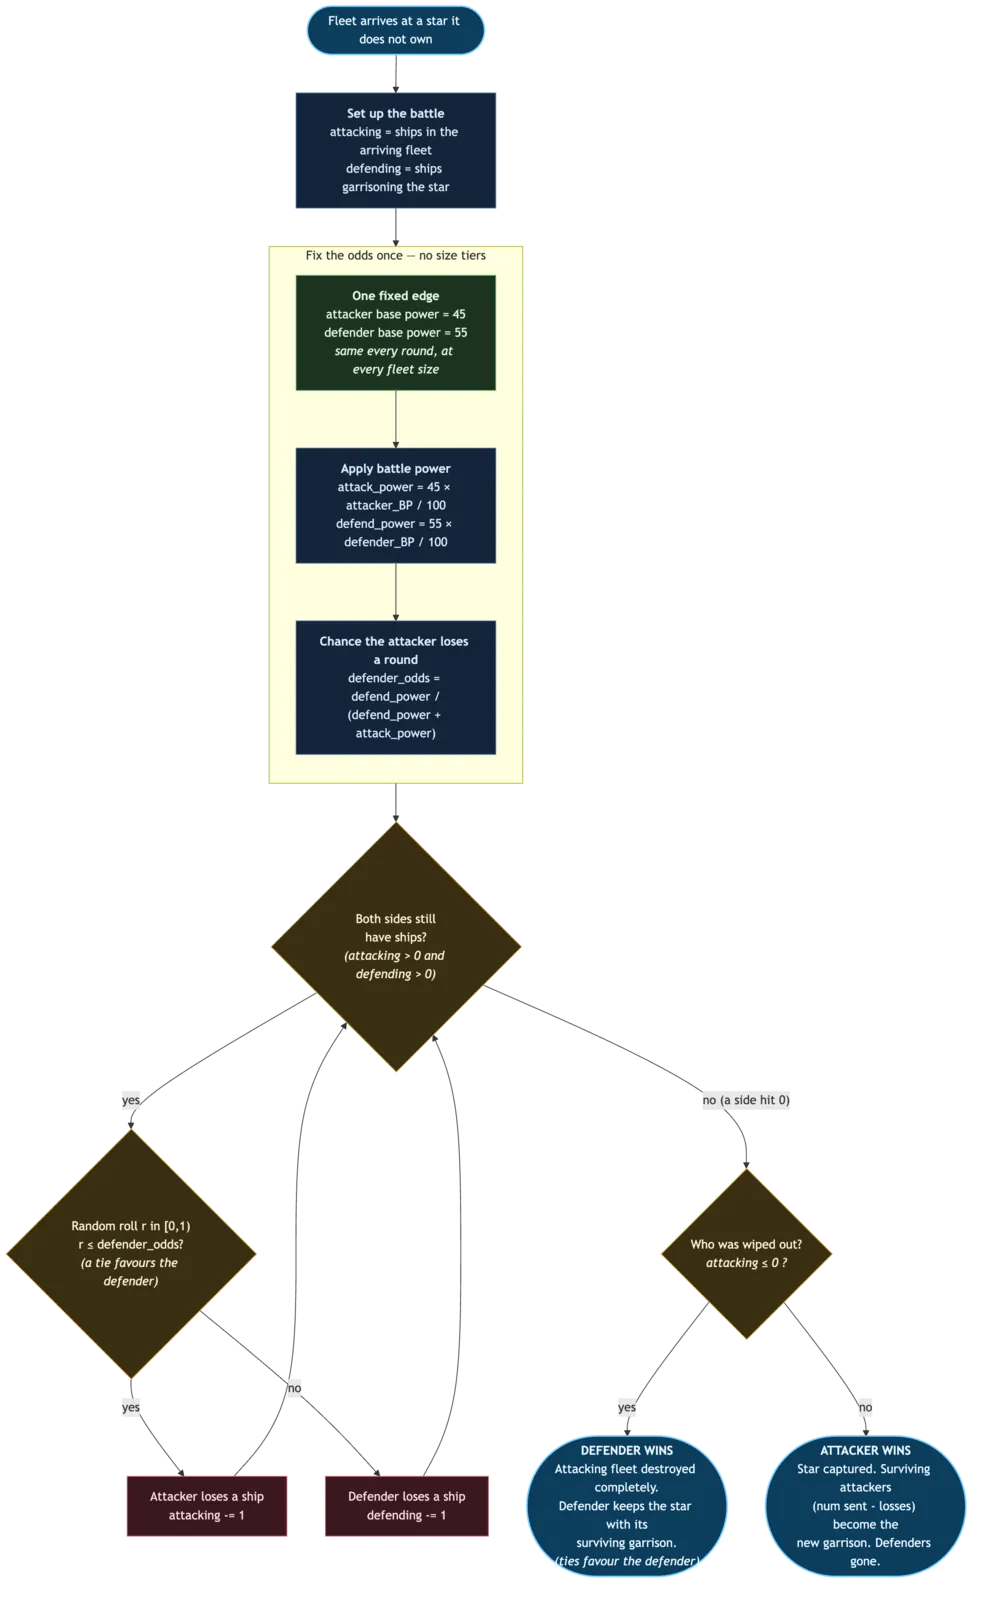
A battle is a series of one-on-one exchanges. Each round, one ship is lost — either an attacker or a defender — and the battle continues until one side has no ships left. The side still standing wins.
Two things decide who loses each round: the force ratio and battle power.
The flow chart below traces a battle from the moment your fleet arrives to the final verdict. The sections that follow explain each step in turn.
The defender has a fixed edge
Each round, the defender wins with a slight, fixed edge — about 55/45 in their favour.
Two fleets, one instant. When two attacking fleets arrive at the same star at the very same moment, they fight one after the other: the first fleet battles the full garrison, and the second meets whatever survived. Order is deterministic, so a coordinated pincer resolves the same way every time — but the second wave always fights the leftovers, never a fresh garrison alongside the first.
That edge is the same no matter how large the two fleets are, and it does not change as ships fall during the fight. There are no size brackets to memorise: the defender always has a small home-field advantage, and you win by bringing more ships.
Numbers still decide the fight — through attrition. A bigger fleet can afford to lose more rounds, so it grinds the defender down first. And because that 55/45 edge repeats every round, it adds up: two evenly matched fleets favour the defender comfortably, and the bigger the battle, the more that small edge compounds. To make an even fight of it, bring about 25% more ships than the defender; to be confident, bring more still.
Battle power tilts the odds further
Each side's base odds are then scaled by its battle power. A commander with battle power above the standard 100 fights above their weight; one below fights below it. Battle power applies whether you are attacking or defending, so investing in it strengthens your whole empire at once.
Ties favour the defender
If both fleets would be wiped out together, the defender wins and keeps the star. When in doubt, the defender has the advantage.
Winning, losing, and capturing
- If the attacker wins: the star changes hands. You become its owner, and your surviving ships (those not lost in the fighting) become its new garrison. The defenders are gone.
- If the defender wins: your attacking fleet is destroyed completely. The defender keeps the star, having lost only the ships that fell in the battle.
The losing fleet is always annihilated; only the winner keeps survivors. This is why a failed assault is so costly — you lose every ship you sent and gain nothing.
A battle reveals numbers, not defences. Attacking tells you the enemy's fleet size — nothing more. If your assault fails, the map updates to show the defenders who survived; it does not reveal their factories, wealth, or whether they carry a probe or nova shield. For that you still need a spy probe — a single ship is not a cheap scout. (If instead you lose one of your own stars, you keep what you already knew about it — including any shields you'd spotted — and now also see the attacker's remaining ships holding it.)
How many ships should I send?
There is no perfect number, but the principles are clear:
- Against a neutral star, check its garrison (scout it if you cannot see it) and bring comfortably more than it has — remember the defender's edge. Sending exactly as many ships as the defender has is a losing proposition on average.
- To reach even odds against a defender of similar strength, plan to bring about 25% more ships than they have. At equal numbers the defender is favoured; well beyond a 25% edge, the fight tilts firmly your way.
- Raise your battle power if you intend to fight a lot. It improves every engagement and compounds with numbers.
- Hold something back. Stripping a star bare to launch a huge attack leaves it open to a counterstrike. Standing orders (next chapters) help you automate sensible garrisons.
Tip: Scouting before a big attack pays for itself. A 5-credit spy probe tells you exactly how many defenders you face, so you neither waste a fleet on a fortress nor over-commit against an empty star.
Where battles are reported
Battle results appear in the Comms feed, visible to both the attacker and the defender (and to no one else). The report names the star and shows both sides' forces and the outcome — captured, or assault failed. Star names in the report are clickable: select one to jump the map to it.
If you are defending, you do not have to be watching the feed: Nova alerts you whenever one of your stars is attacked — whether you held it or lost it — so a raid on your territory never goes unnoticed. On mobile this arrives as a push notification even when the app is closed (see The Mobile App).